No Bake Oreo Cheesecake
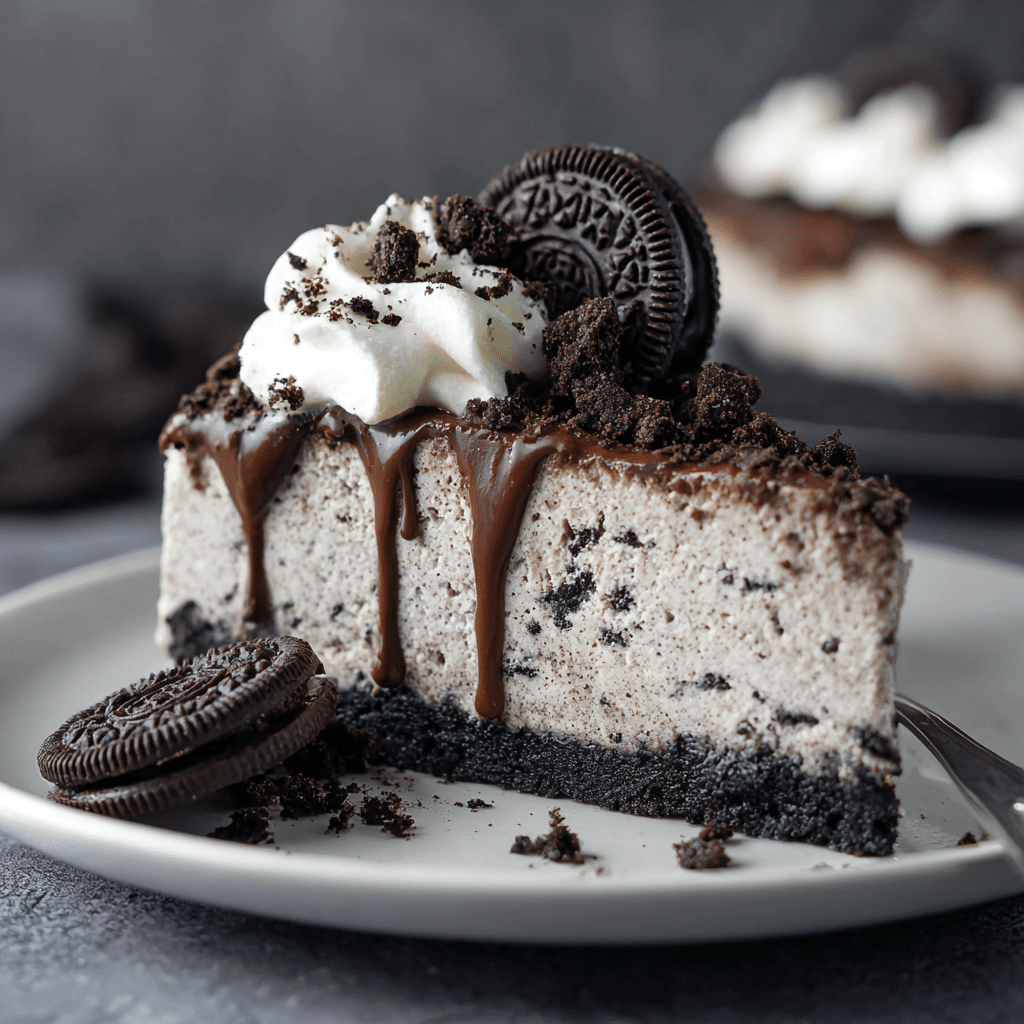
No Bake Oreo Cheesecake is a creamy, dreamy dessert that has won hearts everywhere for its perfect balance of rich, velvety filling and crunchy cookie goodness. This no-fuss recipe combines crushed Oreo cookies with smooth cream cheese and whipped cream, creating a luscious treat that’s ideal for any celebration or simply a delightful indulgence. If you’re seeking a dessert that’s straightforward, crowd-pleasing, and requires no oven time, the No Bake Oreo Cheesecake is your new go-to dessert!
Why You’ll Love This Recipe
- Effortlessly Delicious: You don’t need an oven to enjoy a seriously indulgent dessert that tastes like it took hours to make.
- Perfectly Creamy Texture: The silky cream cheese and whipped cream mixture melts in your mouth alongside crunchy Oreo bits.
- Customizable and Fun: Tailor it with extra toppings, flavors, or dietary swaps to match your mood and guests’ preferences.
- Quick to Prepare: From start to fridge, this cheesecake comes together in under 20 minutes, making it ideal for last-minute treats.
- Great for Any Occasion: From family gatherings to parties, this dessert is always a crowd favorite and impresses every time.
Ingredients You’ll Need
The magic of a No Bake Oreo Cheesecake lies in its few simple ingredients that each play a crucial role in its delightful taste and texture. These accessible kitchen staples combine to form the perfect harmony of creamy richness and Oreo crunch, making this dessert a guaranteed winner.
- Oreo Cookies: Crushed to create a crunchy crust and folded into the filling for texture and bold Oreo flavor.
- Cream Cheese: The creamy base that provides richness and body to the cheesecake filling.
- Whipped Cream: Adds lightness and fluffiness that balances the cheesecake’s density.
- Granulated Sugar: Sweetens the filling just enough to complement the chocolate and cream flavors.
- Unsalted Butter: Helps bind the Oreo crumbs into a sturdy, buttery crust.
- Vanilla Extract: Enhances the flavor profile with a warm, aromatic note.
Variations for No Bake Oreo Cheesecake
One of the best parts about making No Bake Oreo Cheesecake is how easy it is to switch things up based on the ingredients you have or your dietary preferences. Feel free to experiment and make this recipe your own!
- Chocolate Lovers’ Twist: Add melted chocolate swirls or cocoa powder into the filling for an extra chocolate punch.
- Gluten-Free Option: Use gluten-free Oreo-style cookies to make this cheesecake safe for gluten-sensitive guests.
- Fruit Infusion: Incorporate crushed strawberries or raspberries inside the filling for a fresh, fruity surprise.
- Vegan Adaptation: Replace cream cheese and whipped cream with vegan-friendly alternatives for a plant-based version.
- Peanut Butter Add-In: Mix peanut butter into the cream cheese layer to create a creamy peanut butter Oreo combo.

How to Make No Bake Oreo Cheesecake
Step 1: Prepare the Oreo Crust
Start by crushing your Oreo cookies finely using a food processor or a ziplock bag and rolling pin. Melt the unsalted butter and mix it thoroughly with the crushed cookies, then press this mixture firmly into the base of your springform pan or pie dish to form a solid crust. Chill it in the fridge to set while you prepare the filling.
Step 2: Make the Cream Cheese Filling
Using a stand mixer or hand blender, beat softened cream cheese with sugar and vanilla extract until smooth and creamy. Gently fold in whipped cream to lighten the texture and add a fluffy dimension.
Step 3: Add Oreo Pieces to the Filling
Chop some Oreo cookies into chunks and fold them into the cream cheese mixture for bursts of cookie crunch throughout the filling.
Step 4: Assemble the Cheesecake
Pour the creamy Oreo filling over the chilled crust, spreading it evenly with a spatula to create smooth, even layers.
Step 5: Chill Until Set
Cover the assembled cheesecake and refrigerate for at least 4 hours, or preferably overnight, allowing the flavors to meld and the filling to firm up beautifully.
Pro Tips for Making No Bake Oreo Cheesecake
- Room Temperature Ingredients: Ensure cream cheese is softened to avoid lumps and achieve a silky filling.
- Use Fresh Whipped Cream: Freshly whipped cream blends better with the cream cheese for a lighter texture.
- Press the Crust Firmly: Firm pressure when packing the crust keeps it from crumbling when serving.
- Don’t Overmix: Gently fold ingredients to keep the filling airy and not dense.
- Chill Thoroughly: Patience in the fridge is key for the cheesecake to firm up and flavors to intensify.
How to Serve No Bake Oreo Cheesecake
Garnishes
Elevate your cheesecake by topping it with extra Oreo crumbs, whipped cream dollops, or even chocolate shavings for an irresistible finishing touch.
Side Dishes
Pair the No Bake Oreo Cheesecake with fresh berries, a scoop of vanilla ice cream, or a drizzle of caramel or chocolate sauce to complement its flavors.
Creative Ways to Present
Serve in individual mini jars or mason jars for a charming and effortless presentation perfect for parties or gifting.
Make Ahead and Storage
Storing Leftovers
Keep your leftover No Bake Oreo Cheesecake covered tightly in the refrigerator for up to 4 days to maintain freshness and texture.
Freezing
This cheesecake freezes beautifully; wrap it tightly in plastic wrap and foil, then freeze for up to 1 month. Thaw overnight in the fridge before serving.
Reheating
No Bake Oreo Cheesecake is best enjoyed chilled, so avoid reheating. Simply let it sit at room temperature for 10 minutes before serving for optimal flavor and texture.
FAQs
Can I use regular cream instead of whipped cream?
While regular cream can be whipped at home, using whipped cream already prepared or whipping fresh cream yourself ensures the filling remains light and fluffy, which is key for the perfect No Bake Oreo Cheesecake texture.
Do I have to use Oreo cookies specifically?
Oreos are iconic for their distinctive flavor and texture, but you can substitute with any chocolate sandwich cookie if desired. Just ensure the cookies have a similar crumbly texture for the crust.
Is this recipe suitable for beginners?
Absolutely! No Bake Oreo Cheesecake requires simple steps with no baking involved, making it one of the easiest yet most impressive desserts for beginner bakers or cooks.
How long should I chill the cheesecake?
For best results, chill for at least 4 hours to allow the cheesecake to set properly, although overnight chilling gives even better flavor and texture.
Can I make mini No Bake Oreo Cheesecakes?
Yes! This recipe scales down perfectly for mini servings in ramekins or small jars, great for portion control or party favors.
Final Thoughts
If you’re searching for a dessert that’s simple, delicious, and utterly irresistible, the No Bake Oreo Cheesecake is a must-try. Its creamy filling, crunchy crust, and flawless Oreo flavor make it a standout, whether for special occasions or just because. Trust me, this is one recipe you’ll want to make again and again!
Related Posts
PrintNo Bake Oreo Cheesecake

No Bake Oreo Cheesecake is a creamy and indulgent dessert featuring a crunchy Oreo cookie crust combined with a smooth cream cheese and whipped cream filling. This easy, no-oven recipe takes under 20 minutes to prepare and is perfect for celebrations or any occasion needing a crowd-pleasing treat. Enjoy a luscious balance of rich, velvety texture and Oreo cookie crunch in every bite.
- Prep Time: 15 minutes
- Cook Time: 0 minutes
- Total Time: 4 hours 15 minutes
- Yield: 8 servings 1x
- Category: Dessert
- Method: No Bake
- Cuisine: American
- Diet: Vegetarian
Ingredients
For the Oreo Crust
- 24 Oreo Cookies, crushed
- 6 tablespoons Unsalted Butter, melted
For the Cream Cheese Filling
- 16 oz (450g) Cream Cheese, softened
- 1 cup Whipped Cream, freshly whipped
- 1/2 cup Granulated Sugar
- 1 teaspoon Vanilla Extract
- 6 Oreo Cookies, chopped into chunks
Instructions
- Prepare the Oreo Crust: Crush Oreo cookies finely using a food processor or place in a ziplock bag and crush with a rolling pin. Melt the unsalted butter and mix thoroughly with the crushed Oreo crumbs. Press the mixture firmly into the base of a springform pan or pie dish to form an even, solid crust. Chill in the refrigerator to set while preparing the filling.
- Make the Cream Cheese Filling: In a stand mixer or with a hand blender, beat the softened cream cheese with granulated sugar and vanilla extract until the mixture is smooth and creamy. Gently fold in freshly whipped cream to lighten the texture and add fluffiness.
- Add Oreo Pieces to the Filling: Chop additional Oreo cookies into chunks and fold them into the cream cheese mixture to create bursts of cookie crunch throughout the filling.
- Assemble the Cheesecake: Pour the creamy Oreo filling over the chilled crust, spreading it evenly with a spatula to create smooth, even layers.
- Chill Until Set: Cover the assembled cheesecake and refrigerate for at least 4 hours, preferably overnight, allowing the flavors to meld and the filling to firm up beautifully.
Notes
- Use room temperature cream cheese to avoid lumps and ensure a silky smooth filling.
- Freshly whipped cream blends better with cream cheese to keep the filling airy and light.
- Press the crust mixture firmly to prevent crumbling when serving.
- Fold ingredients gently to maintain a fluffy and not dense texture.
- Chill the cheesecake thoroughly for best flavor and texture development.
Nutrition
- Serving Size: 1 slice (1/8 of cheesecake)
- Calories: 350 kcal
- Sugar: 24 g
- Sodium: 200 mg
- Fat: 24 g
- Saturated Fat: 14 g
- Unsaturated Fat: 8 g
- Trans Fat: 0.5 g
- Carbohydrates: 28 g
- Fiber: 1 g
- Protein: 5 g
- Cholesterol: 75 mg
Keywords: No Bake, Oreo, Cheesecake, Cream Cheese, Dessert, Easy Dessert, Crowd Pleaser, Party Dessert