Easy No Bake Peanut Butter Oat Cups Recipe
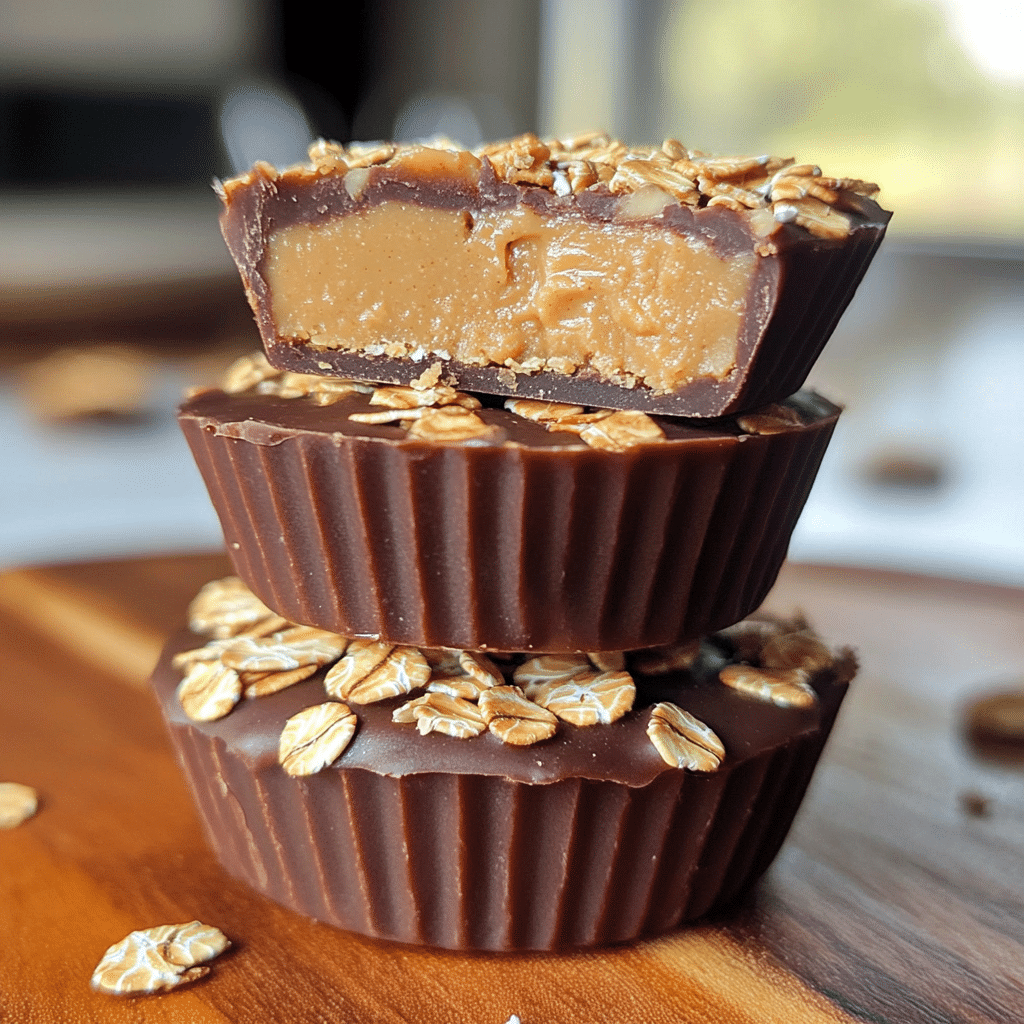
Discover a quick, delicious treat with this No Bake Peanut Butter Oat Cups recipe that’s perfect for snack lovers who want flavorful bites without turning on the oven. These easy-to-make oat cups combine creamy peanut butter, wholesome oats, and just the right touch of sweetness, delivering a satisfying snack that’s both nourishing and addictive. Whether you’re after a midday energy boost or a guilt-free dessert, these no bake peanut butter oat cups are your new go-to.
Why You’ll Love This Recipe
- Super speedy preparation: No baking means these cups come together in minutes, saving you precious time in the kitchen.
- Wholesome and natural ingredients: Made with pantry staples like oats and peanut butter, they’re both nutritious and comforting.
- Perfectly portioned snacks: These cups are easy to grab on the go, making them great for busy days or lunchboxes.
- Customizable flavor: You can easily swap add-ins or toppings to suit your own taste or dietary needs.
- Kid-approved treat: Naturally sweet and chewy, these oat cups are a hit with kids and adults alike.
Ingredients You’ll Need
Keeping it simple is the key to success with this recipe. Each ingredient plays an essential role, bringing texture, flavor, and just the right consistency to your no bake peanut butter oat cups.
- Rolled oats: The chewy base that adds heartiness and fiber to keep you satisfied.
- Creamy peanut butter: Provides richness and protein, plus that classic nutty flavor.
- Honey or maple syrup: A natural sweetener that binds everything while delivering gentle sweetness.
- Vanilla extract: Enhances the flavors and adds a warm, aromatic note.
- Mini chocolate chips (optional): For a touch of indulgence that melts slightly when the cups set.
- Chia seeds or flaxseeds (optional): Boosts nutrition with omega-3 fats and fiber without overpowering the taste.
Variations for No Bake Peanut Butter Oat Cups
This recipe is wonderfully versatile—feel free to experiment and adjust based on what you have on hand or your personal preferences. You’ll see just how easy it is to make your own twist on these classic no bake peanut butter oat cups.
- Nut butter swap: Use almond butter, cashew butter, or sunflower seed butter if you want a different flavor or need a peanut-free option.
- Added crunch: Fold in chopped nuts, seeds, or coconut flakes for texture variety.
- Fruit flavor boost: Stir in dried cranberries, raisins, or chopped dates for natural sweetness and chew.
- Boost protein: Add a scoop of protein powder to turn these into a recovery snack after workouts.
- Spiced up: Sprinkle cinnamon, nutmeg, or a pinch of sea salt to heighten complexity and balance sweetness.

How to Make No Bake Peanut Butter Oat Cups
Step 1: Prep Your Ingredients
Gather all ingredients and measure them carefully. If using add-ins like nuts or seeds, chop or prepare them now to ensure even distribution.
Step 2: Mix Wet Ingredients
In a medium-sized bowl, combine the peanut butter, honey or maple syrup, and vanilla extract. Stir until smooth and creamy, which makes the binding easier for the oats.
Step 3: Add Dry Ingredients
Gradually fold in the rolled oats, plus any optional add-ins like chocolate chips or seeds. Mix until everything is evenly coated and sticks together.
Step 4: Form the Cups
Line a muffin tin with paper liners or lightly grease it. Spoon the mixture into each cup, pressing firmly to shape and compact the mixture so it holds well once set.
Step 5: Chill Until Firm
Place the tin in the refrigerator for at least an hour to fully set. This step is crucial for getting the perfect bite-ready texture in your no bake peanut butter oat cups.
Pro Tips for Making No Bake Peanut Butter Oat Cups
- Use natural peanut butter: It melts and binds better, and avoids unnecessary additives or excess oils.
- Press firmly: Compacting the mixture in the cups helps them hold their shape after chilling.
- Customize sweetness: Adjust honey or syrup amounts based on preference and the natural sweetness of your peanut butter.
- Chill thoroughly: Don’t skip the chilling time; it makes all the difference in texture and ease of handling.
- Store properly: Keep the cups in an airtight container to maintain freshness and chewiness.
How to Serve No Bake Peanut Butter Oat Cups
Garnishes
A sprinkle of crushed peanuts, a drizzle of melted dark chocolate, or a dash of sea salt on top transforms these oat cups into elegant treats perfect for guests or yourself.
Side Dishes
Pair your no bake peanut butter oat cups with fresh fruit like apple slices or berries for a balanced snack, or serve alongside a cup of steaming herbal tea or cold milk for a comforting combo.
Creative Ways to Present
Try stacking the cups on a pretty plate with parchment paper between each layer, or place them in small treat bags for gifting. They also look adorable served in mini cupcake liners with colorful sprinkles around the edges.
Make Ahead and Storage
Storing Leftovers
Keep your no bake peanut butter oat cups in an airtight container in the fridge for up to 1 week, ensuring they stay chewy and fresh without drying out.
Freezing
These oat cups freeze beautifully—just place them in a freezer-safe container or bag, separated by parchment paper, and store for up to 3 months. Thaw in the fridge overnight before enjoying.
Reheating
Since these are no bake, reheating isn’t necessary, but if you prefer a softer texture, warm them slightly in the microwave for about 10 seconds or let them sit at room temperature for a few minutes.
FAQs
Can I use quick oats instead of rolled oats?
While quick oats can work in a pinch, rolled oats provide the best texture and chewiness for these no bake peanut butter oat cups, helping them hold together nicely.
Is it possible to make this recipe vegan?
Absolutely! Substitute honey with maple syrup or agave nectar, and ensure your peanut butter contains no animal ingredients for a fully vegan-friendly snack.
How long do these no bake peanut butter oat cups last?
Stored properly in the fridge, they stay fresh and tasty for up to a week, making them ideal for busy snack prep.
Can I add protein powder to this recipe?
Yes, adding a scoop of your favorite protein powder boosts nutrition and can turn these cups into a perfect post-workout snack.
What’s the best way to prevent the cups from sticking?
Using paper muffin liners or lightly greasing the pan works wonders to make removal easy and keep the cups intact.
Final Thoughts
You’ve just unlocked an easy, nourishing snack that feels like a treat every time. The No Bake Peanut Butter Oat Cups recipe is perfect for any time you want something tasty, quick, and satisfying without the fuss of baking. So grab your ingredients, give this recipe a try, and enjoy these lovable oat cups that everyone will want more of!
Related Posts
- Why Irresistible Glazed Buttermilk Beignets Shine
- Why Cream Cheese-Filled Banana Bread Is Irresistible
- Why Moist Banana Cake with Cream Cheese Frosting Wins
No Bake Peanut Butter Oat Cups

Enjoy these No Bake Peanut Butter Oat Cups, a quick, wholesome, and delicious snack that requires no oven time. Made with creamy peanut butter, rolled oats, and natural sweeteners, these oat cups are perfect for an energy boost, guilt-free dessert, or an on-the-go treat. Easy to customize and kid-approved, they deliver a satisfying chewy texture with a nutty flavor.
- Prep Time: 10 minutes
- Cook Time: 0 minutes
- Total Time: 1 hour 10 minutes
- Yield: 12 cups 1x
- Category: Appetizers
- Method: No Bake
- Cuisine: American
- Diet: Gluten Free
Ingredients
Main Ingredients
- 1 1/2 cups rolled oats
- 3/4 cup creamy peanut butter
- 1/4 cup honey or maple syrup
- 1 teaspoon vanilla extract
Optional Add-ins
- 1/4 cup mini chocolate chips
- 1 tablespoon chia seeds or flaxseeds
Instructions
- Prep Your Ingredients: Gather and measure all ingredients. If including optional add-ins like nuts or seeds, chop or prepare them now for even distribution.
- Mix Wet Ingredients: In a medium bowl, combine the peanut butter, honey or maple syrup, and vanilla extract. Stir until smooth and creamy to bind the oats effectively.
- Add Dry Ingredients: Gradually fold in the rolled oats and any optional add-ins such as mini chocolate chips or seeds. Mix until everything is evenly coated and the mixture sticks together.
- Form the Cups: Line a muffin tin with paper liners or lightly grease it. Spoon the mixture into each cup, pressing firmly to compact and shape so they hold well after chilling.
- Chill Until Firm: Refrigerate the muffin tin for at least one hour to allow the oat cups to set and achieve the ideal bite-ready texture.
Notes
- Use natural peanut butter without added oils or sugars for better melting and binding.
- Press the mixture firmly into the muffin tin to ensure the cups maintain shape after chilling.
- Customize sweetness by adjusting honey or maple syrup according to taste and peanut butter sweetness.
- Do not skip chilling; it is essential for texture and ease of removal.
- Store finished cups in an airtight container in the refrigerator to keep them fresh and chewy.
Nutrition
- Serving Size: 1 cup
- Calories: 150
- Sugar: 7g
- Sodium: 50mg
- Fat: 9g
- Saturated Fat: 2g
- Unsaturated Fat: 6g
- Trans Fat: 0g
- Carbohydrates: 15g
- Fiber: 3g
- Protein: 5g
- Cholesterol: 0mg
Keywords: no bake, peanut butter, oat cups, snack, easy recipe, healthy snack, gluten free, quick snack, kid friendly